Description[]
Obviously, Keynote is a plug-in for Metasequoia. It lets one add animation to a model by creating bones which let you pose the model and such inside the program. It also comes with an exporter that saves your animated model in Microsoft's standardized X format which provides some ability to transfer it into other programs. Unfortunately... It's all in Japanese although an unofficial English translation is availiable. When downloaded and installed to Meta, it appears in the side menu under 'Misc' (in the 'Command' section) as ボーン, which means, predictably, 'bone'. It can be downloaded from the official site here by clicking the 'sheet of paper' icon. Or here (f27.aaa.livedoor.jp) by clicking the 'DownLoad' button. The button directly above the download link is the readme.txt file.
There isn't any official English patch as of now (6/24/2011). There are, however, several Keynote tutorials, one of which can be found here (Sword of Moonlight).
[]

1. []
[]
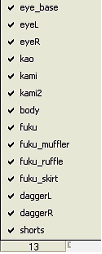
- Brings up menu of the model's objects and lets you set them as 'visible' or not in the current frame.
2. []
[]
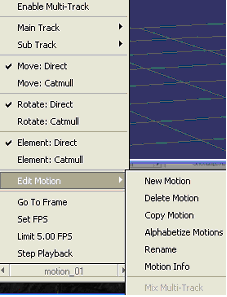
- Enable Multi-Track : Lets you play two animations at the same time.
- Main Track : The primary animation when using Multi-Track. If the 'Main' and 'Sub' tracks have different motions for the same bone in a single frame, the Main track will override the Sub track's movement for that bone
- Sub-Track : The secondary animation when using tracks. Its bone motions are overridden by the Main track if there is a conflict.
- Move Direct/Catmull : When Keynote calculates a bone's movement path (aka XYZ) between key frames (interpolates), this toggles the bone's travel path between moving directly or using a 'curved' Catmull path.
- Rotate Direct/Catmull : When Keynote calculates a bone's rotation path (aka HPB) between key frames (interpolates), this toggles the bone's rotation path between moving directly or using a 'curved' Catmull path.
- Element Direct/Catmull : When Keynote calculates a mix-ratio for morphing elements between key frames, this toggles the ratio between a uniform 'proportional' percentage and a more 'fluid' Catmull mix-ratio. You can watch the effect in the morph slider's position during playback.
- Edit Motion
- New Motion : Make a new blank Motion
- Delete Motion : Deletes current Motion
- Copy Motion : Clones current Motion
- Copy Range : lets you enter which frames will be copied to the new motion
- Offset by : Lets you shift the location of copied key frames forward or backwards
- Elements to copy
- Bone movements and rotations= copies XYZ movements and HPB rotations to the new animation
- Elements and Visibilities = Copies Morph ratios and object 'visibilities' to the new animation
- Motion of selected bones only= copies XYZ movements and HPB rotations for the selected bones to the new animation.
- Alphabetize motions : Reorders all motions so their names are in 'alphabetical order'. Keynote sorts number-names as "1, 10, 100, 2, 20, 3..." and so on.
- Rename : renames current motion
- Motion info : shows you technical info about the current animation
- Mix Multi Track : Joins multi-track animations into a single new animation. You must have "Multi-Track" enabled and have a main and sub track set for this to work.
- Go to frame= Jumps to desired frame. useful for long animations
- Set FPS = Sets the how many frames the animation should playback per second. This number will be exported with the model as its 'default speed'.
- Limit FPS = Limits how many times your computer (video card etc) will be asked to draw the animation per second. This does NOT affect the animation's playback speed, only your computers burden. If this option is unchecked, your computer will draw the model as many times as it can per second. If you notice high computer load while playing animations, this is likely the cause.
- Step Playback = Keynote normally alters playback behavior so that your animation appears to play at the 'SetFPS' speed regardless of how fast your PC can actually render the model. Checking this option turns that feature off and makes the animation play at 1:1 speed as per your PC's ability.
3. []
[]
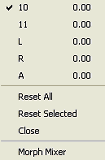
- Reset All : Resets all morph 'sliders to center'.
- Reset Selected : Resets checked morph 'slider to center'
- Close : Greys out morph adjustment slider.
- Morph Mixer : Opens panel that lets you adjust multiple morph objects at once
4.[]
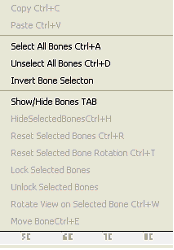
- Copy : Copies the position of selected bones.
- Paste : Moves selected bones to the position they were in during 'copy'
- Select All Bones : Selects all bones
- Invert Bone Selection : Reverses which bones are selected and not selected
- Show/Hide bones : Hides or unhides bone outlines
- Reset Selected Bones : Returns bones to their original XYZ and HPB positions relative to their parent bone
- Reset Selected Bone Rotations: Returns bone to its original angle (HPB value) without moving it (XYZ)
- Lock/Unlock Selected Bones : Displays or hides the 'move node' on 'floating' bones; the node lets you drag the bone to a different location (XYZ)
- Rotate View On Selected Bone : Makes the camera view rotate with the selected bone as it's center
- Move Bone : Lets you enter a specific number value for moving/rotating selected bone
5.[]
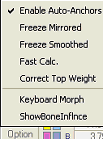
- Enable Auto Anchors : Enables a keynote feature that links the model's mesh to move with a bone based on common needs. It's designed to let people create models without setting up 'anchors'.
- Freeze Mirrored : If a model uses the 'mirror patch' in Metasequoia, Keynote will add the mirrored half to the pose when the Freeze button is pushed. This also makes Keynote display the mirrored half.
- Freeze Smoothed : If a model uses a 'smoothing patch' in Metasquoia, Keynote will add the smoothed effect to the pose when the Freeze button is pushed. This also makes Keynote display the smoothing effect.
- Fast Calc. : Not sure. I read that it 'separates vertices when calculating vertex weight', but I'm not sure what effect that would have
- Correct Top Weight : Not sure.
- Keyboard Morph : If this marked, you can auto-add a morph to a frame by typing the first letter of its name (name must be start with a capital letter). Example, an element-object named "elem:Under..." could be applied by pressing 'u'. This interferes with standard keyboard shortcuts if an element uses a letter key that already had a function.
- Show Bone Influence : Shows how much influence selected bone is exerting on the model's vertices.
Other Buttons[]
- Copy : Copies the position of selected bones.
- Paste : Moves selected bones to the position they were in during 'copy'
- Add : Sets the models current pose as a 'key frame'
- Reset : Resets selected bones to their original 'un-posed' position
- Mirror : Reverses the Pitch and Bank (P,B) rotations of selected bones. Doesn't work on some bone setups
- Delete : Deletes current key frame
- Undo : Undoes recent changes to the model's pose
- Redo : Undoes Undo ;)
- Local / World : Toggles bone rotation coordinates between using 'local' or 'world' notations. In other words, makes the handle stay straight and level, or turn relative to the bone's position.
- Freeze : Changes the actual model to match the current pose in keynote. This can be dangerous is pressed accidentally and can only be undone using Metasequoia's 'undo' button.
- Option : Opens a sub menu with various Keynote options
- [Colored blocks] : lets you change which colors are used for bones
- Default Bone : normal non-selected bone color
- Hot Light : Bone color when under mouse pointer
- Constrain : Bone color when under the influence of a Constraint setup.
- Select : Bone color when selected
- Default Scene : Camera color in Scene mode
- Rigid Body : unknown
- H : Selected bone's 'Heading' angle (Purple handle)
- P : Selected bone's 'Pitch' angle (Green handle)
- B : Selected bone's 'Banking' angle (Yellow handle).
- X : Location of the selected bone's head along the X axis (left right)
- Y : Location of the selected bone's head along the Y axis (up down)
- Z : Location of the selected bone's head along the Z axis (forward back)
- Motion/Scene : Toggles between normal animation mode and scene 'movie making' mode. Scene mode has not yet been fully implemented in Keynote.
Keyboard Shortcuts:[]
Ctrl + C Copy
Shift + C Only copy bone information
Ctrl + V Paste
Ctrl + Z Undo
Ctrl + Y Redo
Ctrl + A Select all bones
Ctrl + D Deselect all bones
Ctrl + R Resets selected bone to its initial position (relative to parent)
Ctrl + T Resets selected bone's rotation (HPB) to its original direction
Ctrl + M Mirror
Ctrl + W Sets selected bone as center of view rotation
Ctrl + L Toggles the lock on moving 'floating bones' around (XYZ)
Ctrl + H Hide selected bones
Ctrl + E Change selected bone's position or rotation numerically
Shift + E Open morph mixer panel
Ctrl + G Go to the specified frame
Ctrl + I Display motion information
Ctrl + B Copy Motion
S Toggle Single / Multi-track mode
W Toggles between 'world' and 'local' coordinate notations
G Cycles through pop-up sub menus
F or R-Arrow Go to the next frame
D or L-Arrow Go to previous frame
Shift+ F or R-Arrow Go to the next keyframe
Shift+ D or L-Arrow Go to the previous keyframe
INS Add keyframe
DEL Delete keyframe
TAB Show / Hide bones
SPACE stop animation playback
BkSpace Toggle between Motion and Scene modes
Atl + Ctrl + F Freeze model in current pose
PageUp Next motion
PageDn Previous motion
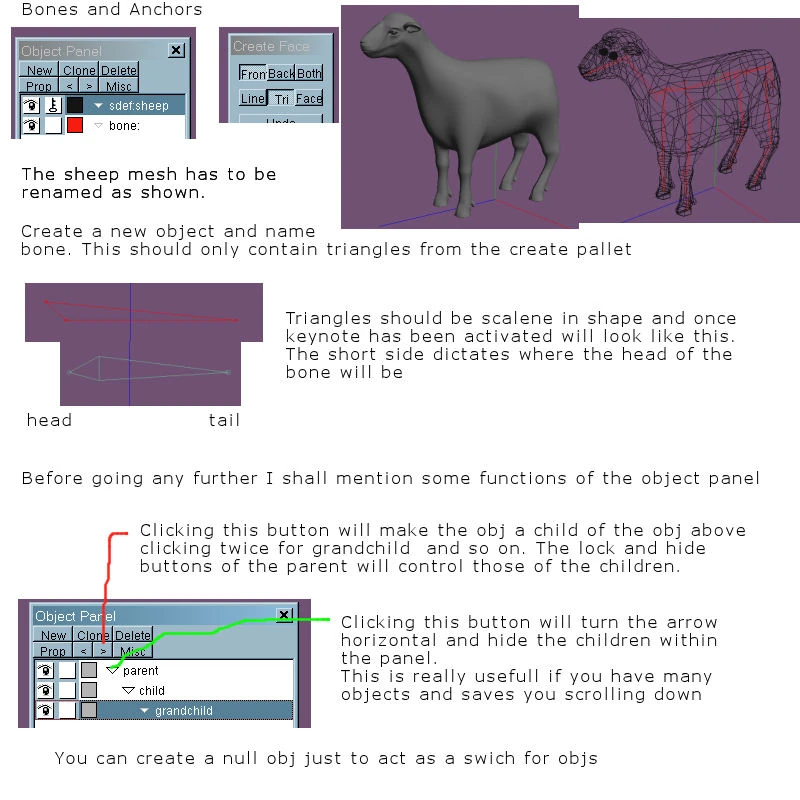
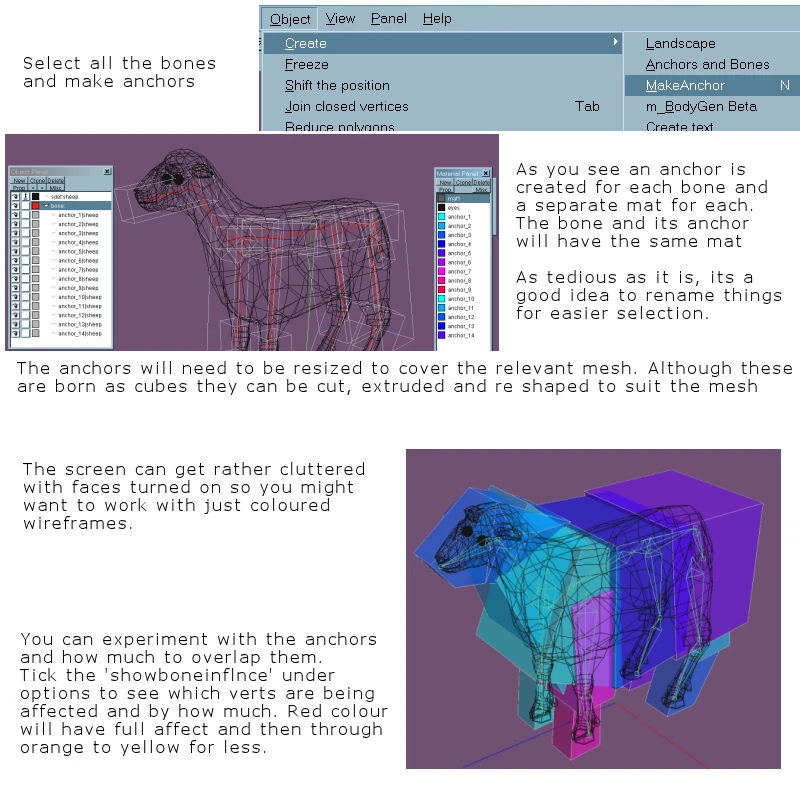
Anchors and Bones[]
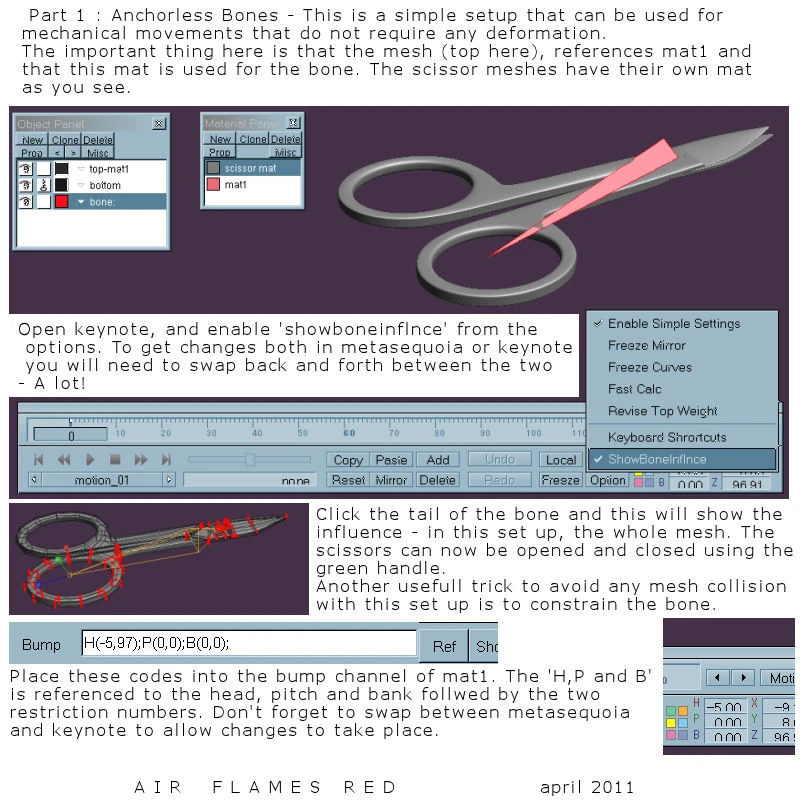
Anchorless Bones[]
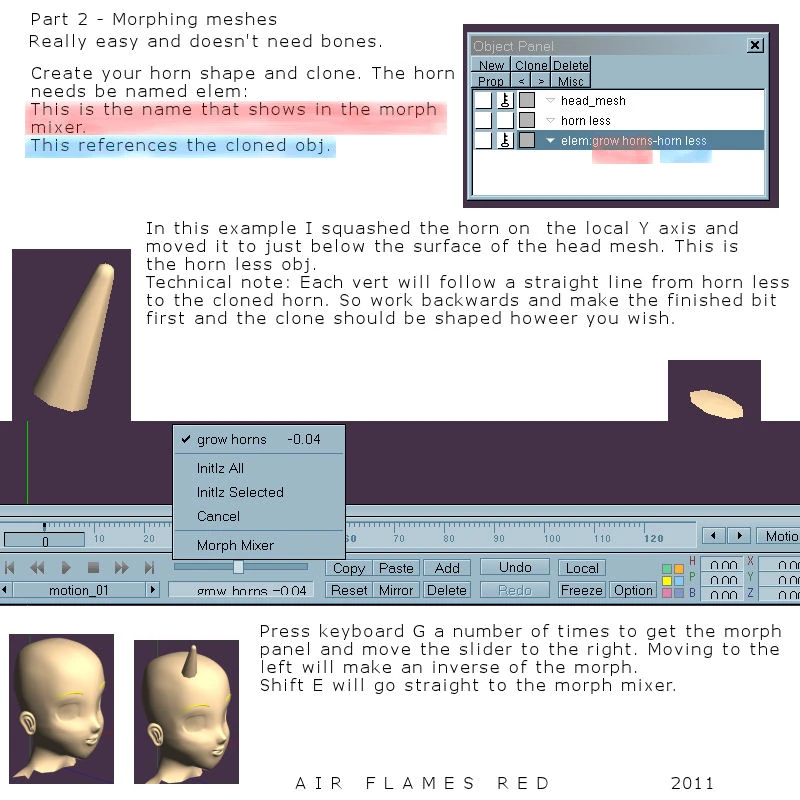
Morphing[]
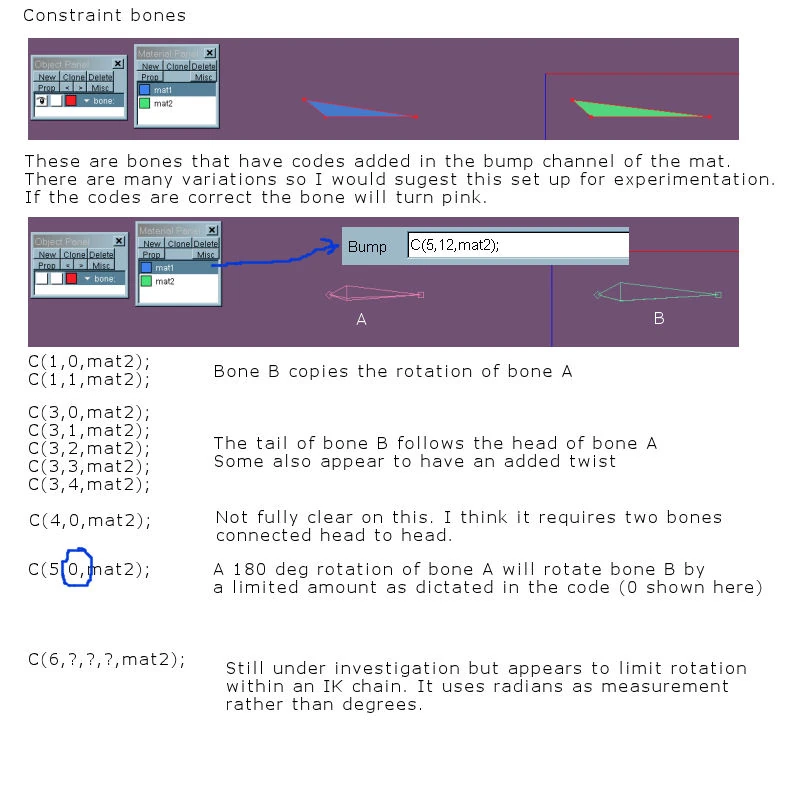
Constraint Bones[]
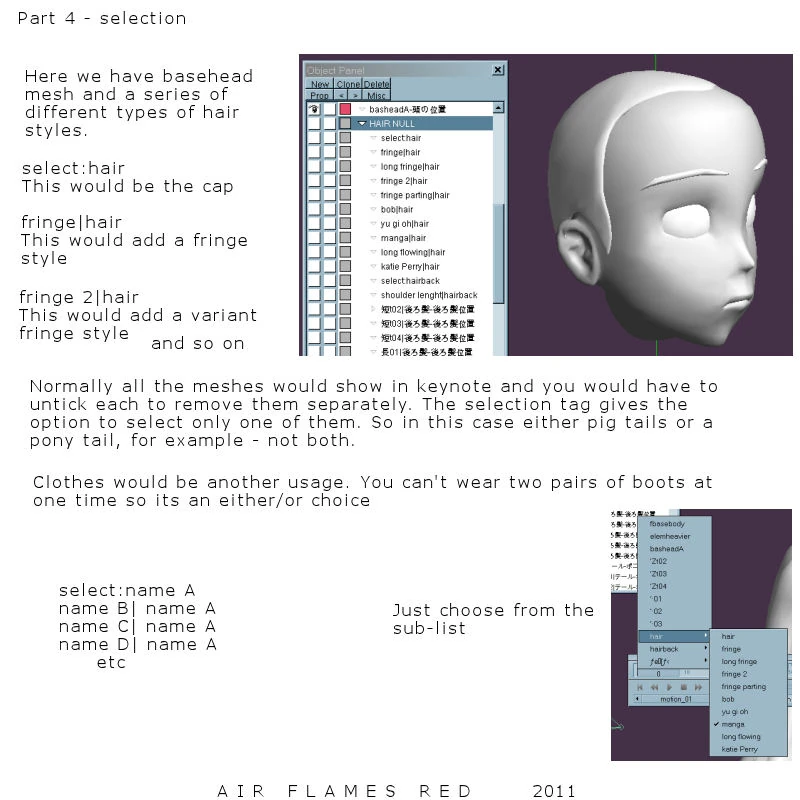
Selection Toggle[]